If you’ve added Unity3d games using the iframe trick I talked about in my Embed Unity3d Games in a WordPress Page article, you may have come to realize, as I did, that it doesn’t work that great when the game is not fully self-enclosed (i.e. you want there to be some interaction between your game and some outside resource, such as a server-side high score table).
Granted, if your game is fully enclosed and doesn’t communicate with anything outside of the game at all, the iframe method works just fine. But you may still want to follow along here anyway, because this method is a little bit easier to use once its all set up properly.
Note that unlike that previous post though, this method requires you to have a hosted version of WordPress and have access to view and modify the PHP files that power your site. I’m sure this method could be turned into a plugin (and probably would actually work better that way, as really this is plugin-style functionality and would only require access to install plugins), or even a custom Gutenberg block. But I didn’t think of that until I had already finished, and I have zero experience developing WordPress plugins or custom Gutenberg blocks, so this is the way I did it! 😉
Why Not Just IFrame It?
The reason the iframe trick doesn’t work that great when the program is not self enclosed is due to the Same Origin Policy. As I was updating my 1945 game to include a global high scores table, I was getting an error in my browser console saying “Cross-Origin Request Blocked: The Same Origin Policy disallows reading the remote resource at $somesite.” This indicates that the request was blocked due to violating the CORS security rules.
SOP states that one webpage can request resources from another only if both webpages have the same origin, which is defined as having the same scheme, host, and port. As I looked into why that was happening (my game is requesting a resource located on the same server, using the standard http:// port of 80), it seemed odd that the request was blocked. My best guess is that it is a limitation baked into using the <iframe> tag.
I tested out trying to fix it by adding a crossdomain.xml file, but it didn’t seem to help (i.e. it was still throwing the error for me) but I suppose its worth a shot. This is a sample crossdomain file I found on the web:
<!--?xmlversion="1.0"?-->
<cross-domain-policy>
<allow-access-fromdomain="*">
</allow-access-fromdomain="*">
</cross-domain-policy>
For what its worth, I’ve heard that using the “*” wildcard isn’t great for security purposes, so if this does work you will want to tweak it to allow access specifically from your website.
Returning from our tangent, assuming we want our games to be able to communicate with an outside resource, we need another solution for embedding our games into our WordPress websites… and shortcodes will come to the rescue!
Preparations
First off, while this process can be done using any theme, if you use a published theme such as the Twenty-Twenty theme or something else, if/when you update the theme it might erase some of your work as we are going to be directly modifying some of the theme files. Thus, to preserve your hard work I recommend you make a child theme before starting to code. I won’t go into that since there are plenty of other great tutorials on making child themes.
Create the Shortcode
To create the shortcode, we need to dig into some PHP code. WordPress was written using PHP and we’re going to hook into the existing code in order to add our additional functionality.
Where we are going to hook into the code is in the “functions.php” page in your active theme. Look for the following file, substituting the name of your active theme for [your-theme-name]:
/wp-content/themes/[your-theme-name]/functions.php
You technically could write all your extra functionality directly in this file, but I prefer keeping my custom code separate. So I created a new PHP file in the same directory and called it “custom-functions.php”.
Because WordPress doesn’t know it should use the code from our new PHP page though, we have to tell it to read our new file! At the bottom of the functions.php page, add the following line of code to tell WordPress that we have extra functions that we also want to use:
include('custom-functions.php');
This will tell WordPress to load our new functions when it reaches that line of code. Next, switch over to your new custom-functions.php file. This is the real meat of our project (or mashed potatoes, for our meat-averse friends).
custom-functions.php
Side note: If you’re familiar with PHP and want to skip my line-by-line explanations (or you don’t really want to be a web developer and just want to copy-paste the code), the full code is at the bottom of this section.
In this section, we’re going to use several WordPress functions. If you’re more curious about a function beyond my brief explanation here, all of the function are described in fuller detail within the WordPress Code Reference, and I recommend you check them out there. The Code Reference is an invaluable resource, in much the same way that the Unity Scripting Reference is for programming Unity games!
PHP files always start and end with the following syntax, so lets start by putting these into our new, blank file:
<?php

?>
Inside of those lines goes all the rest of our code we are adding. Most of our code will go in a function, which is fundamentally the same thing as a method in C#, although with slightly different syntax. So lets create our function:
function unity3d_embed_webgl_function( $atts = array() ) {

}
The keyword “function” tells PHP that you have a function (go figure!), followed by the name of your function, the arguments in parentheses, and then the curly braces that designate the function block. Woah, that argument list looks kinda weird! What it’s saying is we don’t care what we get, so long as PHP treats as if it were an array.
Next, lets start coding the function itself. Inside of the curly braces, the first part looks like this:
// Unwrap the shortcode attributes, substituting the given defaults for any undefined attributes
$args = shortcode_atts(
    array(
        'url' => '',
        'width' => '960',
        'height' => '600',
    ),
    $atts
);

$url = esc_attr( $args['url'] );
$width = esc_attr( $args['width'] );
$height = esc_attr( $args['height'] );
What we do here is take the array of shortcode attributes that we passed in and unwrapping them from the array with WordPress’ built-in shortcode function. Then we specifically look for the ‘url,’ ‘width,’ and ‘height,’ attributes. If they are present, they are saved to a new $args array. If they aren’t present, then we instead put the appropriate default value in instead. Then we save the three attributes we care about in their own variables for ease of use and escape any special characters. We escape the characters to help protect us from ourselves: inadvertent SQL injection in our shortcode editor can wreak havok on our filesystem. It also allows us to have special characters in our url, if for whatever reason you want to.
The next part is some sanity checking to make sure we put in a url. Without a url, there won’t be much to do!
// validate the directory is not blank
if ( '' === trim ( $url ) ) {
    $message = __( 'Invalid WebGL location: No location given.' );
    _doing_it_wrong( __FUNCTION__, $message, '4.4.0' );
    return '</p>Invalid WebGL location: No location given.</p>';
}
This just adds a trailing slash if it doesn’t have one already. Pretty simple. Do note that I have ‘https’ in my url. If you don’t have your website using ‘https’, you will want to switch that to ‘http’.
$fullurl = trailingslashit(site_url('/unity/', 'https') . $url);
This section tells WordPress to load the UnityLoader file that Unity creates when you build a WebGL version of your game. This is the first step that references your game files.
// add the UnityLoader javascript file to footer
wp_enqueue_script('unity3d-loader', $fullurl . 'Build/UnityLoader.js', array(), null, true);
This adds the WebGL script to your page, and runs its instantiate method, which causes your game to start.
// add the WebGL.json javascript file to footer
wp_add_inline_script('unity3d-loader', 'var gameInstance = UnityLoader.instantiate("gameContainer", "../unity/' . $url . '/Build/WebGL.json");');
It still won’t show up on the page yet, though. For that, we need this line of code:
// returns the game window html code
return '<div id="gameContainer" style="width: ' . $width . 'px; height: ' . $height . 'px; margin: auto"></div>';
That is the last bit of the function, but your game still won’t show up. What gives?
Well, just like in C#, if you don’t tell WordPress that you actually want to run the function, it just sits there unused. So we need to add one more line of code to our custom-functions script, but this time outside of the function block:
add_shortcode('unity3d_embed_webgl', 'unity3d_embed_webgl_function');
That tells WordPress that you want your function to be loaded as a valid shortcode. When you’re all finished, the full custom-functions.php file should look like this:
<?php

function unity3d_embed_webgl_function( $atts = array() ) {

    // Unwrap the shortcode attributes, substituting the given defaults for any undefined attributes
    $args = shortcode_atts(
        array(
            'url' => '',
            'width' => '960',
            'height' => '600',
        ),
        $atts
    );

    $url = esc_attr( $args['url'] );
    $width = esc_attr( $args['width'] );
    $height = esc_attr( $args['height'] );


    // validate the directory is not blank
    if ( '' === trim ( $url ) ) {
        $message = __( 'Invalid WebGL location: No location given.' );
        _doing_it_wrong( __FUNCTION__, $message, '4.4.0' );
        return '</p>Invalid WebGL location: No location given.</p>';
    }

    $fullurl = trailingslashit(site_url('/unity/', 'https') . $url);

    // add the UnityLoader javascript file to footer
    wp_enqueue_script('unity3d-loader', $fullurl . 'Build/UnityLoader.js', array(), null, true);

    // add the WebGL.json javascript file to footer
    wp_add_inline_script('unity3d-loader', 'var gameInstance = UnityLoader.instantiate("gameContainer", "../unity/' . $url . '/Build/WebGL.json");');

    // returns the game window html code
    return '<div id="gameContainer" style="width: ' . $width . 'px; height: ' . $height . 'px; margin: auto"></div>';
}

add_shortcode('unity3d_embed_webgl', 'unity3d_embed_webgl_function');

?>
The Shortcode… Code
To add your game to your page now, you first upload your game to your webhost as described in Embed Unity3D Games in a WordPress Page. Then add a shortcode block to your page:
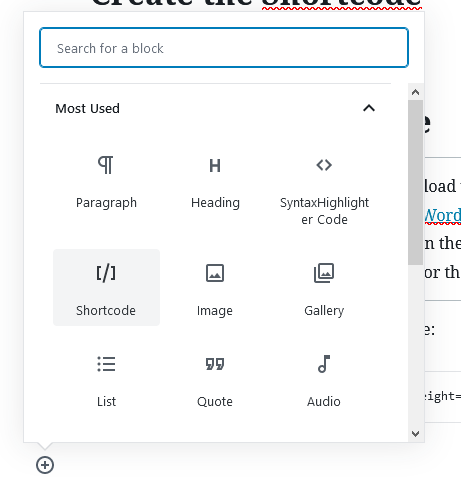
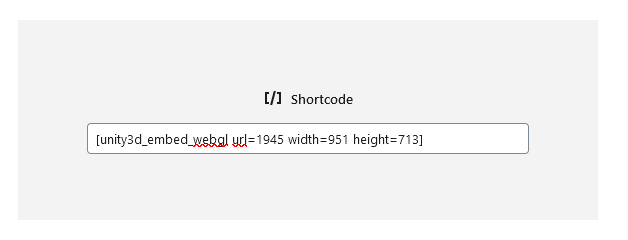
And finally fill in the textbox with your shortcode, giving your game’s information for the url, width, and height (the order shouldn’t matter, as long as you have the name of the shortcode first). This is a sample shortcode for my 1945 game, both in image and text format:
[unity3d_embed_webgl url=1945 width=951 height=713]
And voila! Your Unity game should appear on your website in the location on your page that you put your shortcode!

